(Drawing the Drawing of the sword always results in semantic weirdness.)
It was in early 1994 that I realised this scene was one tough cookie. Two Elves, one at an arm’s and a sword’s length from the other? That means a bit of Elf at the margins of a picture and rather a lot of nothing in the middle. I realised that this was an iconic scene from the Silmarillion, but I abandoned the project after this quick sketch.

(Yes, I was under the impression that Fingolfin was blond.)
One and a half years later, I was doing my first ever watercolours, and I had found out that Fingolfin was dark-haired. I also found that a wider shot would solve part of the problem. I probably realised, theoretically, that foreshortening was called for, but this is 1995 we’re talking. No foreshortening in 1995, no, sir.

So, this year, I took on a commission of this precise scene and knew I would have to deal with foreshortening and some clever positioning.
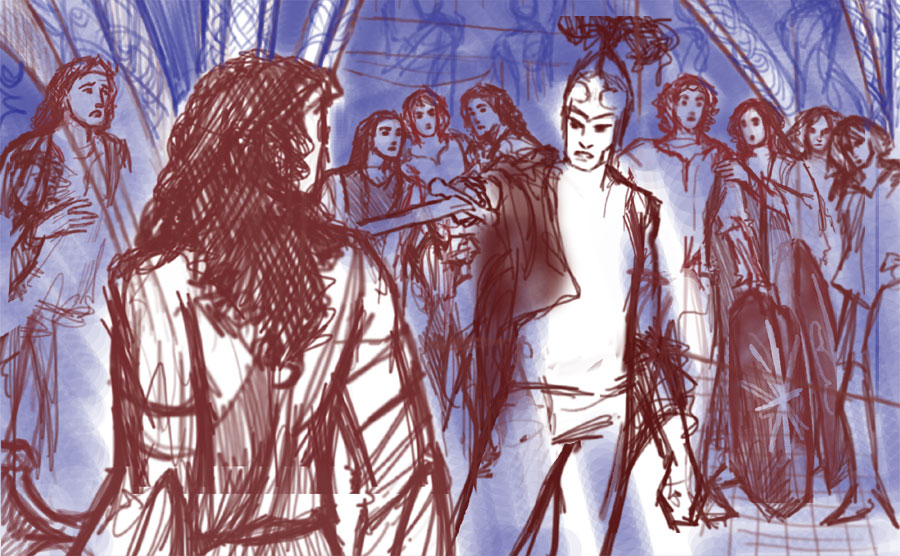
In the first sketch, I still had to resort to a carefully draped cloak in order to cover up my foreshortcomings. Then I got some terrific help from the guys at comicforum.de, and managed to pull the pose off sufficiently for me to go with.
A progress shot from the lineart proper: Underneath, you see the sketch printed out in pale yellow, so I can filter it out later.

Second progress shot.

Final version of the lineart (plus some parchment texture):

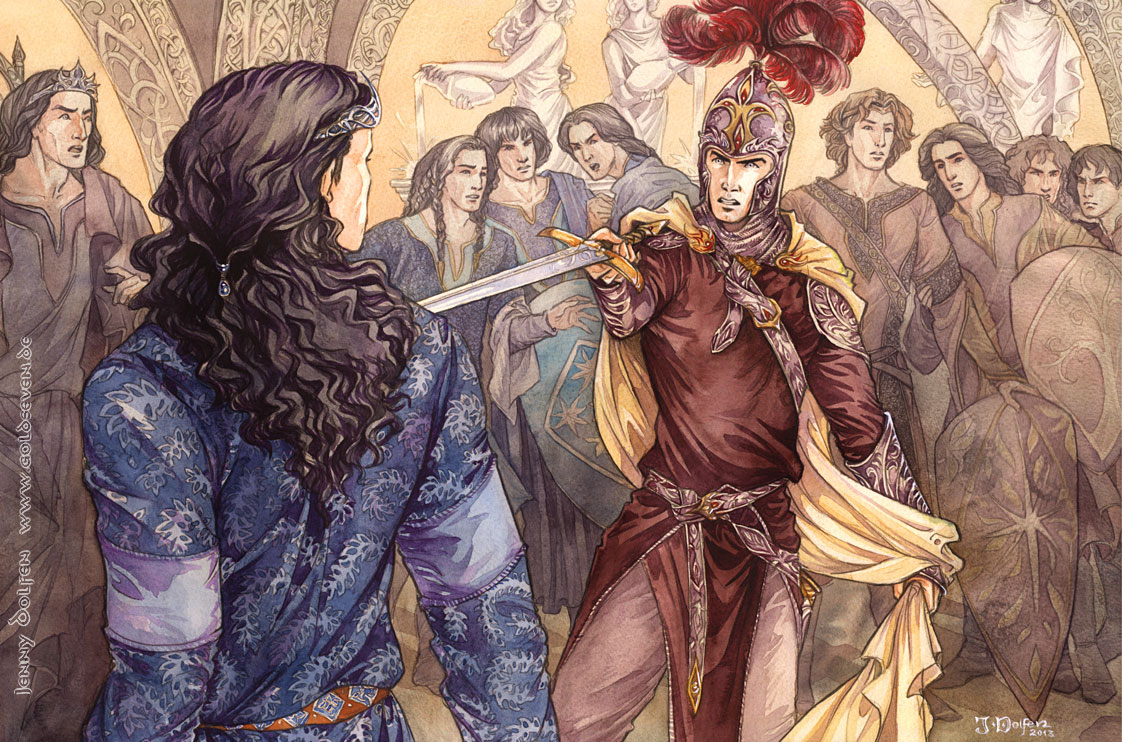
Left to right: Finwë, Fingolfin, Fingon, Turgon, Argon, Fëanor, Maedhros, Maglor, Celegorm, Curufin.
Now for the Painting of the Sword!
… or, how to avoid cluttering up mass scenes. On your second attempt.
In this painting, I have such an amount of detail in the lineart that I have to be careful not to kill the picture with it.Let me give you a fun example of how *not* to do it, from exactly ten years ago when I still signed my pictures with PJ: Messy goblin battle
Why is the colour job in that one such a train wreck? Because I didn’t know yet that the sharpest contrast of an image goes where you want the viewer’s eye to dwell. And only there. Contrast draws the eye. And light and dark contrast draws the eye most. Dark and light contrast across the whole of a picture draws the eye in a sort of crazy polka from which it will want to break as soon as possible and leave the dancefloor. Permanently.
There are loads of ways to avoid this; here is one that works really well with any medium, but requires a bit of planning beforehand. In fact, I had planned this even before I drew the lineart. In even more fact, this only worked to full satisfaction on the second attempt.
My first stage is nothing unusual if you know my workflow: An even layer of a single colour covering everything, to tie the eventual colour scheme together and avoid glaring white highlights that tear the finished image apart. I choose a mix between Yellow Ochre and Sepia with a bit of Cadmium Yellow.
While the paint is still wet (rule of thumb: wet enough to glisten on the paper, not so wet as to form puddles), I go in with a tissue and dab off the paint from the areas that’ll need to stand out later, like Fëanor’s and Fingolfin’s faces, and, most definitely, the sword.
Please note: Sometimes, the colours in the photos here are pretty far away from the actual ones, especially the later images. Too much distraction and not enough light for my silly old digicam.

This is the finished first layer with the faces dabbed lighter:

I want the statues to be lighter than the background, to look like alabaster (and discourage any go-go-girl connotations). Therefore, I paint the background behind everybody slightly darker, but still translucent.

Now I’m going to make sure that all the detail in the background, while still being noticeable, will not distract too much from the foreground.
To that end, I mix a duller colour with more brown, and paint the background figures and arcs with a uniform layer that only leaves out the alabaster statues and the foreground figures.

So we’ll cleanly separate the different grounds – fore, middle, and back. I also add some handsome splashing to the bottom of my darker figure layer, which will stay even when all the rendering is done, to serve as “lost edges”. If you’re unfamiliar with the concept of lost edges, read what the great Mattias Snygg has to say about it.

Now, the detail is still there, and we have an image that is well readable and ready for the next stage – colour.
I then made a mistake. Th idea was to force myself to stay light in the background, so I went against watercolouring etiquette and started with the darkest part of the background figures – their hair. That way, I had something to check every other colour against – nothing must get darker than the hair. The idea was good, but the choice of material was not. I used liquid watercolours, as I have for months now – and they tend to cake up, and lose all of the lightness and transparency that a watercolour should have. And that’s what happened here.

After the stage above, I added a second layer of detailing to the background figures – which killed the piece. Beyond redemption. No matter how lightly you apply liquid watercolours, they always come out more opaque that watercolours from tubes or pans. With my latest pictures, that never bothered me enough to actually scrap a painting, but here, it was inevitable. The second background layer became too dark, killing the detail, clogging up the lineart, and making it almost impossible for me to get the foreground darker and still more detailed than the background.
Before I started painting Fingolfin’s tunic and hair below, I already realised the painting was lost. The foreground didn’t stand out against the background figures any more – they already were too dark.
Lesson learnt: play to the strengths of your materials. Use tubes where you want light and feathery colours. Use liquids where you want it dark and don’t mind opaqueness.
When you arrive at a stage where nothing will save your painting, you take it between two thumbs and forefingers and close your eyes, and only open them again after you’ve heard that RAAAAtttttsch! sound. Makes it easier. Good thing I still had the lineart.

I started anew and went back to this stage above. I used only watercolours from tubes this time, which really avoided that caked look.
This way, instead of doing the light background first and then forcing me to go ever darker in the thing that was more important in the painting, I started with the foreground – so Fëanor and Fingolfin would determine how light the background would have to be. A terminus post quem non, so to speak.
I started with Fingolfin’s tunic, with a wash of Ultramarine damped down by a touch of Indigo and Madder red, leaving lighter some edges to the right, where the light hits. I then mixed some Sepia with Indigo, Burnt Sienna and Madder and started on Fingolfin’s hair, still using only tube-paint.

The picture below shows the second, darker, detailing hair layer.

Then comes a part that’s both very laborious but still rather meditative. People are often amazed how I can have so much patience with patterns. Well, I could never understand why people paint Mandalas! But I suppose it’s much the same.

After the mandala, sorry, tunic-pattern painting. You’ll see I’ve also added some light skin tones (Burnt Sienna with Madder), and started detailing the beads in Fingolfin’s hair.

You’ll notice when painting around the patterns with darker colours I didn’t pay much attention to light and dark, leaving the tunic more flat-looking than in the first stage. So, more shadows are in order. For that, I now use some liquid watercolours, to make the colour more solid and dark. Rendering is easier with liquid watercolours, I find. I add quite a lot of purple to the mix, and start at Fingolfin’s right arm.

And this is what the finished tunic looks like:

I then mix in some darker brown and purple and give the hair the same darker treatment, adding depth and shadow with liquid watercolour:

Then, some detailing on the belt, with Sienna and Ultramarine.

Fingolfin is finished. Time to tackle Fëanor. The overall colour scheme will be blue for the Fingofinians, and red for Fëanoreans, so I start with an oxblood colour on Fëanor’s tunic, mixed from Madder red with some Indigo and Sepia. Tube paints, of course, for transparency.

I then mix much the same colour, plus some darker purple, for the shading – in liquid watercolours for rendering:

Some detail work that I tend to get lost in – hence, no in-progress shots for the metal parts and plumes on his helm. The paint dries so fast that I can work on the next layer almost immediately after painting the first, so I rarely take photos in between. All the colours below are again tube ones.

Some more work on this clothes. I’m undecided with the cloak at this point; I want to make it very light to have Fëanor stand out even more, but for that, I have to check back with the client, so I leave it for the time being. I just add some very delicate gouache to lighter bits on his greaves and other shiny details:

So the foreground figures are as finished as I can make them for the time being, and this is the overall result:

With just a hint of Bunt Sienna and Madder red (tubes, of course, for transparency), I then do the faces in the background, leaving out areas where the light hits. They won’t get a shadow layer at this point. Just a single colour/rendering layer. I can always get darker later if I think the pic can handle it, but I can’t get lighter, as I found out the hard way on the first attempt.

After the faces are painted, I use an extremely light (tube!) layer of Sepia for the hair. And some Burnt Sienna for Maedhros, and some unidentifiable mix for Celegorm, so everybody can pick out a hair colour for him and be happy…

Next, the sons.
I’ve just bought a very nice tube of Cobalt Turquoise, which is blue enough to qualify as “Fingolfinian” but still very different from what Fingolfin wears, and I use it gratuitously on Fingon, Turgon, and Argon, adding a hint of gold here and there to keep them from becoming too monochromatic.

The Fëanoreans get a similar treatment with Madder Red and Burnt Sienna, with a touch of purple and gold here and there. Mainly water on the brush, with just a spot of paint, avoiding the mistakes from the first attempt. And all tube paints, of course.

Next, I do the statues with a very dull mix of Sepia, Madder Red, and a touch of Ultramarine, only painting very light shadows.


Next, I splash around with rather a lot of purple tones on Finwë. Some redder, some bluer, to show how torn he is between the followings of his sons.
In the end, Fëanor is given a pale gold cloak, and some minor touchups to shadows and such follow… and we’re done! Please click for full view. :)

Ahem… and as I frequently do when a new year begins, I changed my signature. People keep telling me to include “Dolfen” somewhere; and I keep finding that my previous “Jenny+Year” was fine for pencil but difficult to do with brushes.
Detail shots:

So, I wish you all a Happy New Year! Drawing Runes this New Year’s Eve brought me Isa, Ice, the Rune of Stagnation. I suppose there can be worse things than stagnating on the level I’ve reached last year (brought to you by Inguz, Rune of Fertility, drawn a year ago). Better than the Rune of Bottomless Plummet or something.

 The other huge difference is: when acrylic dries, it’s completely insoluble. When you add layers in watercolour, you will always slightly dissolve bottom layers. In acrylics, you can use completely transparent layers that leave all the detail work in place underneath. Whether you add dark shadows or light fog – I did both in the “Trasimene” pic linked above – it opens a world of opportunities.


